- 2023年に書いたnginxにWordPress設置する方法の記事ではOSがbulleseye時代で古い。
- 2年以上経過して読み直すと、構成が分かりにくい。
- 間違いを見つけた
このような理由から、2025年に通用できる、
Rspberry Pi OS (bookworm) 上のnginxにWordPressを設置する方法
を出来るだけ分かりやすく書いてみようと思い立ちました。
私のメモとしてログを残しています。
はじめに
おことわり
本記事のサーバ知識は全て独学であり、専門的に学んでおりません。出来る限りの検証を繰り返した上で内容を書いていますが、故障や不具合等が発生した場合には一切責任を負えません。予めご了承ください。
ラズパイでWordPress運用の感想
結論
- 試してみる価値はあると思います。# SSD起動で # 有線 1000Mbps 接続で # PHPのRAM割り当てを調整して
- WooCommerceで試験的に制作したECサイトをiPhoneの4G回線から確認しましたが、挙動は予想以上にキビキビ、サクサク。
- 本格的に長期に運用するのは、OSの安定性やSoCのパフォーマンス、4GBRAM容量などスペック面が不安。
- 不正アクセスによるルーターへの不要な負荷が原因なのか、家のWi-Fi全体のパフォーマンスが落ちた気がする。# 後述しています
用途・環境・前提
用途
- WordPressサイトをテストするためのWebサーバ
複数のWordPressテーマのデザインレイアウトを確認するために、ローカルに複数のWordPressを設置すると、
テンプレート毎にサイト制作できて便利です。
ラズパイは長期に渡ってWebサーバを運用するには不向きだと、私は思っています。
ラズパイOSまるごと不具合を起こすと、コンテンツ復旧が困難になる、と考えるからです。
RAM容量面でもWordPressを動かすには不十分で、不安に感じます。
メモ RaspberryPi 4 model B 4GBRAM の適している用途
1ヶ月の電気代が計算上、約76円[1]ラズパイのTDP3.4W, … Continue readingとなり、安心して24時間運用できます。
cronで深夜に、update, upgrade, reboot, を設定しておけば、
放置し続けて気楽です。
環境
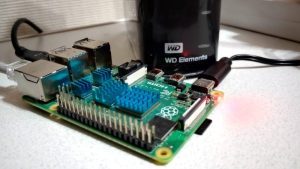
- RaspberryPi 4 model B 4GBRAM, SSD起動: SSD起動方法はこちらの記事へ
- OS: Raspberry Pi OS with desktop (bookworm) 64-bit
- 有線LAN接続(リンク速度1000Mbps):bookwormでのIPアドレス固定化のやり方はこちらの記事へ
- SSH接続で構築(Ubuntu 24.04.3 LTSから接続):SSH接続のやり方はこちらの記事へ
コマンド uname
pi@raspberrypi:~ $ uname -a
Linux raspberrypi 6.12.34+rpt-rpi-v8 #1 SMP PREEMPT Debian 1:6.12.34-1+rpt1~bookworm (2025-06-26) aarch64 GNU/Linux前提
本記事では、
- ラズパイにUbuntuのTerminal(端末)でSSH接続している:Terminalの記事はこちら SSH接続の記事はこちら
- ラズパイにufwをインストール・有効化済である:ufwの記事はこちら
- ラズパイのシステムユーザー:pi(sudo 権限を有している)
- ラズパイのホスト名:raspberrypi
- 構築していくWordPressサイトのドメイン:
cute.mydns.vc- ご自身のドメインに置き換えてください。
- MyDNSでドメイン無料取得はこちらの記事へ
- リモート元のUbuntuで cute.mydns.vc の名前解決を済ましている:名前解決のやり方の記事はこちら
- Terminal(端末)の中で行数が多くなり入力しにくい場合:clear で文字を一掃してください
という前提で進んでいきます。
bookwormにWordPressをインストールする手順の流れ
手順・概要
- LAMPの順序のようにインストール # LAMPの意味はこちらの記事へ
- nginx インストール
- mariadb-server インストール
- php インストール
- nginx 設定
- ドメインのSSL化
- phpをWordPress仕様に調整
- WordPress インストール
bullseyeとbookwormで異なる点
bulleseye時代と異なる点は、phpのバージョンが8.2であること[2]2025-08-29現在。[3]Ubuntuのphpバージョンは、8.3, 2025-09-02現在。。
bookwormのnginx 設定ファイル /etc/nginx/sites-available/default の中では、バージョン7.4としてコメントアウトされているので、手入力で修正する必要があります。
この段落では例を示すだけで、実際の作業は後述しています。
◎ bookwormにインストールされているphpのバージョンの確認方法
pi@raspberrypi:~ $ cd /etc/php
pi@raspberrypi:/etc/php $ ls
8.2◎ /etc/nginx/sites-available/default 変更前:バージョン7.4(7行目)
# pass PHP scripts to FastCGI server
#
#location ~ \.php$ {
# include snippets/fastcgi-php.conf;
#
# # With php-fpm (or other unix sockets):
# fastcgi_pass unix:/run/php/php7.4-fpm.sock;
# # With php-cgi (or other tcp sockets):
# fastcgi_pass 127.0.0.1:9000;
#}◎ /etc/nginx/sites-available/default 変更後:7.4を8.2に変更(7行目)
# pass PHP scripts to FastCGI server
#
location ~ \.php$ {
include snippets/fastcgi-php.conf;
#
# # With php-fpm (or other unix sockets):
fastcgi_pass unix:/run/php/php8.2-fpm.sock;
# # With php-cgi (or other tcp sockets):
# fastcgi_pass 127.0.0.1:9000;
}LAMPの順序のようにインストール
- 関連記事:LAMPとは?
WordPressが動くWebサーバを構築するためのパッケージをインストールしていきます。
インストールするパッケージは、大きく分けて3つです。
- nginx:Webサーバ
- mariadb-server:データベースサーバ
- php 関係:WordPress を動かすための言語
nginx インストール
コマンド sudo apt install
sudo apt install nginxmariadb-server インストール
sudo apt install mariadb-serverphp インストール
下のコマンドでは、apacheでWordPressを動かすPHPに加えて、php-fpm[4]Nginx は PHP を直接処理できないため、PHP-FPM が FastCGI というプロトコルを利用して Nginx と PHP の橋渡しを行います。引用:入門 – Nginx + PHP-FPM … Continue reading を追加しています。
apache関連は不要と思われるかもしれませんが、大した容量でもないので、
念の為インストール内容に入れています。
WordPressプラグインの中には、以下のどれかのphp不足が原因で正しく機能しない場合があります。
私の体験では、php-gdのインストールが抜け落ちて、SiteGurad WP Pluginの画像認証が動作しなくなりました。
一通りのphpをインストールしておくのが無難だと思います。
sudo apt install php libapache2-mod-php php-fpm php-mysql php-curl php-gd php-mbstring php-xml php-xmlrpc php-soap php-intlこの時点で apache が nginx より優先して作動していると思います。
apacheを無効化します。
sudo systemctl status apache2Qキーを打鍵して、下のコマンドを入力。
sudo systemctl disable apache2nginx 設定
概要
nginxディレクトリ配下の2つのディレクトリだけ使います。
Point- sites-available
- sites-enabled
この2点を意識しておくと、迷子になりにくくなると思います。
/etc/nginx/sites-available/default のバックアップ
1.sites-availableディレクトリへ移動。
pi@raspberrypi:~ $ cd /etc/nginx
pi@raspberrypi:/etc/nginx $ ls
conf.d koi-win nginx.conf sites-enabled
fastcgi.conf mime.types proxy_params snippets
fastcgi_params modules-available scgi_params uwsgi_params
koi-utf modules-enabled sites-available win-utf
pi@raspberrypi:/etc/nginx $ cd ./sites-available
pi@raspberrypi:/etc/nginx/sites-available $ ls
default2.defaultという名前のファイルを default.bakという名前でバックアップ。
pi@raspberrypi:/etc/nginx/sites-available $ sudo cp default default.bak
pi@raspberrypi:/etc/nginx/sites-available $ ls
default default.bak3.defaultファイルを目的のドメイン名 cute.mydns.vc.conf という設定ファイル名で複製。
pi@raspberrypi:/etc/nginx/sites-available $ sudo cp default cute.mydns.vc.conf
pi@raspberrypi:/etc/nginx/sites-available $ ls
cute.mydns.vc.conf default default.bak4.default server のポートを cute.mydns.vcサーバーが使用できるために、defaultファイルをnanoで編集します。
sudo nano /etc/nginx/sites-available/default下の4行目、5行目部分の行頭に # を入力し、コメントアウトします(赤字)。
# Default server configuration
#
server {
# listen 80 default_server;
# listen [::]:80 default_server;# Default server configuration
#
server {
# listen 80 default_server;
# listen [::]:80 default_server;nanoを保存します。
nginx 設定ファイルを編集
1.cute.mydns.vc.conf をnanoで編集します。
sudo nano /etc/nginx/sites-available/cute.mydns.vc.confこのステップで5箇所の赤字部分を変更してください。
注意 /index.php?$args[5]デフォルトではないパーマリンクがクエリ文字列を使っても壊れないように、”?$args “の部分をインクルードしています。引用:Nginx – … Continue reading を挿入する位置が違うと、WordPress投稿や固定ページの遷移が出来ない経験をしました。
ご注意ください。
# Default server configuration
#
server {
listen 80 default_server;
# listen [::]:80 default_server; root /var/www/cute.mydns.vc;
# Add index.php to the list if you are using PHP
index index.php index.html index.htm index.nginx-debian.html;
server_name cute.mydns.vc;
location / {
# First attempt to serve request as file, then
# as directory, then fall back to displaying a 404.
try_files $uri $uri/ =404 /index.php?$args;
}nanoを閉じて保存します。
2.DocumentRootDirectory を作成します。
/var/www 配下にドメイン名のディレクトリを作ります。
sudo mkdir /var/www/cute.mydns.vc3.sites-enabled ディレクトリにシンボリックリンクを作成します。
memo この工程はとても重要です。sites-enabled 配下に /etc/nginx/sites-available/cute.mydns.vc.conf のシンボリックリンクが無いと、目的とするドメインでサイト有効化できません。後で行う certbot によるSSL化でも、違った記述で自動書き換えられ、「目的とするドメインでSSL化出来ているのにPHPが正常に動作しない」「portやserver nameのコンフリクト」などを経験しました。
sites-enabled ディレクトリに移動。
pi@raspberrypi:~ $ cd /etc/nginx
pi@raspberrypi:/etc/nginx $ ls
conf.d koi-win nginx.conf sites-enabled
fastcgi.conf mime.types proxy_params snippets
fastcgi_params modules-available scgi_params uwsgi_params
koi-utf modules-enabled sites-available win-utf
pi@raspberrypi:/etc/nginx $ cd ./sites-enabledディレクトリ内で、cute.mydns.vc.conf のシンボリックリンクを作ります[6]参考:Ubuntu 24.04 : Nginx : バーチャルホストの設定 : Server World, 2025-08-29閲覧。。
pi@raspberrypi:/etc/nginx/sites-enabled $ sudo ln -s /etc/nginx/sites-available/cute.mydns.vc.conf ./
pi@raspberrypi:/etc/nginx/sites-enabled $ ls
cute.mydns.vc.conf defaultnginx の文法チェック。
Point この文法チェックはとても大事です。この時点でエラーを発見しておかないと、後の工程で手間が大幅に増えて、Webサーバ構築・WordPressインストール作業を断念したくなるくらい、エラー解決に疲労します。
sudo nginx -t以下のような結果になればOKです。
nginx: the configuration file /etc/nginx/nginx.conf syntax is ok
nginx: configuration file /etc/nginx/nginx.conf test is successfulnginx に設定を再読込。再起動。
sudo systemctl reload nginx
sudo systemctl restart nginxufw で’Nginx Full’を許可
Point- ufwの設定は、nginx をインストール後に行ってください。
- nginxインストール時にプロファイルが作られるので、’Nginx Full’が可能となります。
- ポート番号80, 443にufwルールを適用します。
sudo ufw allow 'Nginx Full'コマンド sudo ufw sutatus で適用を確認。
pi@raspberrypi:~ $ sudo ufw status
Status: active
To Action From
-- ------ ----
XXXXX XXXXX XXXXXXX
Nginx Full ALLOW Anywhere
Nginx Full (v6) ALLOW Anywhere (v6)nginx 動作確認
1.nginxの動作確認。
pi@raspberrypi:~ $ sudo systemctl status nginx
● nginx.service - A high performance web server and a reverse proxy server
Loaded: loaded (/lib/systemd/system/nginx.service; enabled; preset: enable>
Active: active (running) since Fri 2025-08-29 20:35:26 JST; 17min ago
Docs: man:nginx(8)
Process: 2940 ExecStartPre=/usr/sbin/nginx -t -q -g daemon on; master_proce>
Process: 2941 ExecStart=/usr/sbin/nginx -g daemon on; master_process on; (c>
Main PID: 2942 (nginx)
Tasks: 5 (limit: 3919)
CPU: 51ms
CGroup: /system.slice/nginx.service
├─2942 "nginx: master process /usr/sbin/nginx -g daemon on; master>
├─2943 "nginx: worker process"
├─2944 "nginx: worker process"
├─2945 "nginx: worker process"
└─2946 "nginx: worker process"active (running) ならOKです。
Qキーを打鍵して抜けます。
2.DocumentRootDirectoryにテストページを作成して、動作確認。
- DocumentRootDirectoryに移動
- nano で index.html ファイルを作成
DocumentRootDirectory の概念的な図解は、こちらの過去記事へ。
Point cute.mydns.vc というフォルダの中に、index.html というファイルを作成するイメージになります。
DocumentRootDirectoryに移動。
コマンド cd
pi@raspberrypi:~ $ cd /var/www/cute.mydns.vcindex.html をnanoで編集(新規ファイルになります)。
pi@raspberrypi:/var/www/cute.mydns.vc $ sudo nano index.html備考 下のソースは、Server World 様から引用させて頂きました。
<html>
<body>
<p style="width: 100%; font-size: 40px; font-weight: bold; text-align: center;">
Nginx Virtual Host Test Page
</p>
</body>
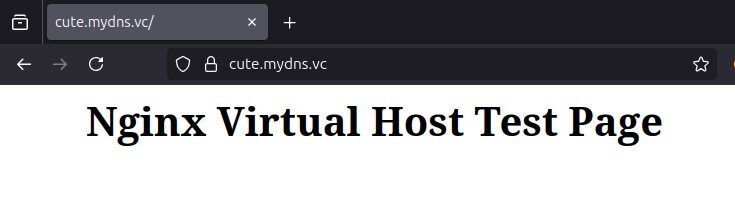
</html>3.Ubuntuのブラウザにドメイン cute.mydns.vc を入力してアクセス。
注意 ドメインにアクセスできない場合は、名前解決できていない可能性があります。
# 名前解決はこちらの記事へ
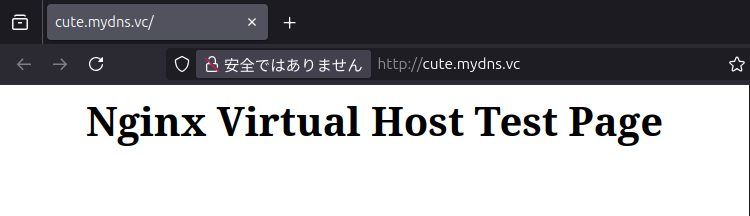
nginx の動作確認できました。
ドメインをSSL化
事前準備
1.certbotをnginx用プラグインと一緒にインストールします。
sudo apt install certbot python3-certbot-nginx2.certbot でドメインをSSL化します。
sudo certbot --nginx -d cute.mydns.vc下のように進みます。赤字は自分で入力。黄色が表示されればSSL化に成功。
pi@raspberrypi:~ $ sudo certbot --nginx -d cute.mydns.vc
Saving debug log to /var/log/letsencrypt/letsencrypt.log
Enter email address (used for urgent renewal and security notices)
(Enter 'c' to cancel): example@example.com
- - - - - - - - - - - - - - - - - - - - - - - - - - - - - - - - - - - - - - - -
Please read the Terms of Service at
![]()
![]() letsencrypt.org You must
agree in order to register with the ACME server. Do you agree?
- - - - - - - - - - - - - - - - - - - - - - - - - - - - - - - - - - - - - - - -
(Y)es/(N)o: y
- - - - - - - - - - - - - - - - - - - - - - - - - - - - - - - - - - - - - - - -
Would you be willing, once your first certificate is successfully issued, to
share your email address with the Electronic Frontier Foundation, a founding
partner of the Let's Encrypt project and the non-profit organization that
develops Certbot? We'd like to send you email about our work encrypting the web,
EFF news, campaigns, and ways to support digital freedom.
- - - - - - - - - - - - - - - - - - - - - - - - - - - - - - - - - - - - - - - -
(Y)es/(N)o: y
Account registered.
Requesting a certificate for cute.mydns.vc
Successfully received certificate.
Certificate is saved at: /etc/letsencrypt/live/cute.mydns.vc/fullchain.pem
Key is saved at: /etc/letsencrypt/live/cute.mydns.vc/privkey.pem
This certificate expires on 2025-11-27.
These files will be updated when the certificate renews.
Certbot has set up a scheduled task to automatically renew this certificate in the background.
Deploying certificate
Successfully deployed certificate for cute.mydns.vc to /etc/nginx/sites-enabled/cute.mydns.vc.conf
Congratulations! You have successfully enabled HTTPS on https://cute.mydns.vc
- - - - - - - - - - - - - - - - - - - - - - - - - - - - - - - - - - - - - - - -
If you like Certbot, please consider supporting our work by:
* Donating to ISRG / Let's Encrypt: https://letsencrypt.org/donate
* Donating to EFF: https://eff.org/donate-le
- - - - - - - - - -
letsencrypt.org You must
agree in order to register with the ACME server. Do you agree?
- - - - - - - - - - - - - - - - - - - - - - - - - - - - - - - - - - - - - - - -
(Y)es/(N)o: y
- - - - - - - - - - - - - - - - - - - - - - - - - - - - - - - - - - - - - - - -
Would you be willing, once your first certificate is successfully issued, to
share your email address with the Electronic Frontier Foundation, a founding
partner of the Let's Encrypt project and the non-profit organization that
develops Certbot? We'd like to send you email about our work encrypting the web,
EFF news, campaigns, and ways to support digital freedom.
- - - - - - - - - - - - - - - - - - - - - - - - - - - - - - - - - - - - - - - -
(Y)es/(N)o: y
Account registered.
Requesting a certificate for cute.mydns.vc
Successfully received certificate.
Certificate is saved at: /etc/letsencrypt/live/cute.mydns.vc/fullchain.pem
Key is saved at: /etc/letsencrypt/live/cute.mydns.vc/privkey.pem
This certificate expires on 2025-11-27.
These files will be updated when the certificate renews.
Certbot has set up a scheduled task to automatically renew this certificate in the background.
Deploying certificate
Successfully deployed certificate for cute.mydns.vc to /etc/nginx/sites-enabled/cute.mydns.vc.conf
Congratulations! You have successfully enabled HTTPS on https://cute.mydns.vc
- - - - - - - - - - - - - - - - - - - - - - - - - - - - - - - - - - - - - - - -
If you like Certbot, please consider supporting our work by:
* Donating to ISRG / Let's Encrypt: https://letsencrypt.org/donate
* Donating to EFF: https://eff.org/donate-le
- - - - - - - - - - 
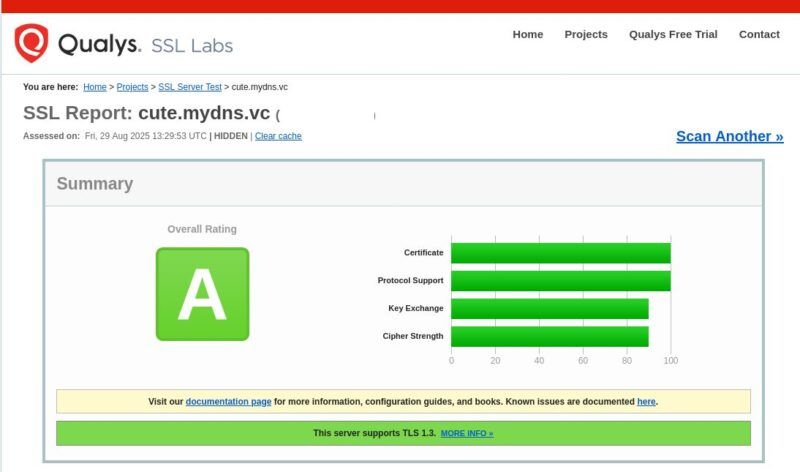
3.certbotによる認証が終わると、Ubuntuのブラウザで、
https://cute.mydns.vc を開くと、SSL接続できています(=port 443)。
4.SSL品質の確認。
https://www.ssllabs.com/ssltest/
5.certbot によるSSL化が成功したら、一旦、ルータのポートを閉じます。
ルータ内のポートマッピング設定を削除します。
外部からアクセスできない状態で、WebサーバやWordPressの設定を進めます。
phpをWordPress仕様に調整
certbotによるSSL化が成功すると、/etc/nginx/sites-available/cute.mydns.vc.conf ファイルが自動的に書き換わっています。
この書き換わったファイルを、nginx上でWordPress仕様のphpが動く仕様に調整します。
nginx設定ファイルを変更
sudo nano /etc/nginx/sites-available/cute.mydns.vc.conf変更前
# pass PHP scripts to FastCGI server
#
#location ~ \.php$ {
# include snippets/fastcgi-php.conf;
#
# # With php-fpm (or other unix sockets):
# fastcgi_pass unix:/run/php/php7.4-fpm.sock;
# # With php-cgi (or other tcp sockets):
# fastcgi_pass 127.0.0.1:9000;
#}変更後
- 赤字の # を削除
- 7.4を8.2に変更
# pass PHP scripts to FastCGI server
#
#location ~ \.php$ {
# include snippets/fastcgi-php.conf;
#
# # With php-fpm (or other unix sockets):
# fastcgi_pass unix:/run/php/php8.2-fpm.sock;
# # With php-cgi (or other tcp sockets):
# fastcgi_pass 127.0.0.1:9000;
#}7.4のままだとWordPressが正常に動作せず、8.2に修正するとうまく動くようになりました。
WordPressがフル稼働するよう、php.ini を調整
概要・流れ
- phpに割り当てるRAMを決める。
- php.ini をバックアップ。
- php.ini を編集。
php.ini の下記の数値を変更します。4箇所だけ。
| max_execution_time = 600 | デフォルトは、30秒。 |
| memory_limit = 3072M | デフォルトは、128M。 |
| post_max_size = 3072M | デフォルトは、8M。 |
| upload_max_filesize = 3072M | デフォルトは、2M。 |
数値の大小関係は、バイト単位で、upload_max_filesize < post_max_size < memory_limit[7]出典: PHP: コア php.ini ディレクティブに関する説明 – Manual, 2025-08-30閲覧。
ここではシンプルに、最大数値となるmemory_limitと同じにしています。
memo 私が契約しているスタードメイン![]() では、最大アップロードサイズ1GBです。どこのレンタルサーバ会社でも、概ねGB単位になっていると思います。
では、最大アップロードサイズ1GBです。どこのレンタルサーバ会社でも、概ねGB単位になっていると思います。
しかし、上の upload_max_filesize のデフォルト値は2MBなので、画像ファイルすらWordPressへまともにアップロード出来ない値となっています。
なので、上の例では思い切って3GBのRAMをPHPに割り当てることにしました。
# 私のラズパイのRAM容量は4GB
phpに割り当てるRAM容量を計算する
phpが使用できるRAM容量が小さいと、WordPress操作の上で、次のような不具合を経験したことがあります。
- WordPressプラグインをインストールできない
- WordPressテーマをアップロードできない
- 画像ファイルなどメディアをアップロードできない
- その他
そこで、phpが使用できるRAM容量を調整します。
1.ラズパイ起動直後の空きRAMを調べます。
sudo reboot
ssh pi@raspberrypiコマンド free -m: MB単位で表示
free -m
total used free shared buff/cache available
Mem: 3795 538 2371 32 993 3257
Swap: 511 0 5112.RAM割り当て容量を計算。
プロのエンジニアの世界では慎重な計算に基づいて行うと思います[8]参考:PHPのメモリ割当量について – Go for it!, nginxの最大接続数は、worker_connectionsでデフォルト値は1024 – CAFE BREAK, 2025-08-30閲覧。が、上記の数値の大小関係で、memory_limit の数値が最大にならなければいけません。
例えば、memory_limit の値を3GBとすると、
WordPressから3GBまでの動画ファイルをアップロードすることが可能になります(ざっくりと理屈上)。
そこで、ここでは、
- bookworm (=OS)が使用するRAM容量に余裕を持たせる
- Webサーバがハングアップしても構わない気構え
注意
アマチュア精神で計算しているので、ご了承ください。全く保証できず、自己責任でお願いします。
(今のところ、ハングアップの経験はありません)
- available[9]参考:リソースの見方を今一度確認してみよう~メモリ使用率~ | SIOS Tech. Lab, 2025-08-30閲覧。 3257MB なので、少しゆとりを残し、3000MBを割り当てるとする。
- php.ini デフォルト値が、128MB。
3000MB÷128MB≒23.4
23.4を切り捨てて、24倍の値を求めるとする。
128MB☓24倍=3072MB最大数値となる memory_limit の値が 3072M に決まったので、
- post_max_size: 3072M
- upload_max_filesize: 3072M
単純に、同じ値にするとします。
php.ini をバックアップ / 編集
php.ini ファイルは記述がとても長い大事なファイルので、バックアップをとります。
1.php.ini の場所へ移動。
pi@raspberrypi:~ $ cd /etc/php
pi@raspberrypi:/etc/php $ ls
8.2
pi@raspberrypi:/etc/php $ cd ./8.2
pi@raspberrypi:/etc/php/8.2 $ ls
apache2 cli fpm mods-available
pi@raspberrypi:/etc/php/8.2 $ cd ./fpm
pi@raspberrypi:/etc/php/8.2/fpm $ ls
conf.d php-fpm.conf php.ini pool.d2.php.ini をバックアップ。
sudo cp /etc/php/8.2/fpm/php.ini /etc/php/8.2/fpm/php.ini.bak3.nano で php.ini を編集します。
sudo nano /etc/php/8.2/fpm/php.ininano の機能で、
- alt+n で一時的に行番号を表示できます。
- ctrl+/ で指定した行へジャンプします[10]php.iniファイルのアップデートにより、将来的に行番号が変更する可能性があります。。
- ctrl+w で指定した文字列を検索します。
409行目 max_execution_time = 600
435行目 memory_limit = 3072M
703行目 post_max_size = 3072M
855行目 upload_max_filesize = 3072M
nano を閉じて保存します。
php.ini の変更を有効にするために、nginx を再起動します[11]出典:XAMPP | PHPの設定ファイル(php.ini)を編集する, 2025-08-30閲覧。。
sudo systemctl restart nginxnginx でphp動作確認
DocumentRootDirectoryにサンプル的にphpファイルを置いて、動作確認を行います。
nano で新規ファイルを作成します。
sudo nano /var/www/cute.mydns.vc/info.phpファイルに以下を記述します。
<?php
phpinfo();
?>nano を閉じて保存します。
Ubuntuのブラウザから https://cute.mydns.vc/info.php にアクセスして、以下のように表示されるとphpはnginx上のSSL化済DocumentRootDirectoryで動いています。
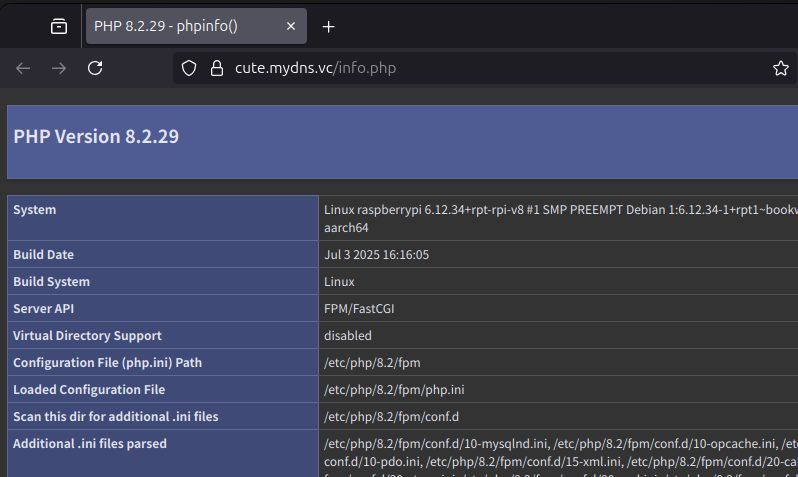
memo 上の画面が表示されない場合、以下の原因が考えられます。
/etc/nginx/sites-available/cute.mydns.vc.confで、PHP-FPMディレクティブの # を削除していない。- php ファイルをダウンロードする挙動 →
/etc/nginx/sites-enabledでシンボリックリンクを作成していない。
WWWからのアクセス者にPHPの細かな仕様を知られると、セキュリティ面で不安なので、すぐにファイルを削除します。
sudo rm /var/www/cute.mydns.vc/info.phpnginx でエラーが生じる場合の解決策
私は以下のエラーを経験しました。
エラー表示
解決策
/etc/nginx/sites-available/cute.mydns.vc.confの phpバージョンが間違っている:- 上記を確認してください。
- ラズパイ側、Ubuntu側、どちらにも名前解決してみる。
- サーバーへの過負荷かも?:PHPへのRAM割り当て値を小さく調整してみる。
- ラズパイを再起動してみる。
まず初めに、1を確認して修正したら、nginx を再起動してみてください。
sudo systemctl restart nginxnginx再起動してみても改善されなければ、他の解決策も試してみてください。
WordPressサイトの作成
概要
- mariadbでデータベース作成
- WordPressデータをSSL化済のDocumentRootDirectoryへ設置
- 希望するドメインにWordPressをインストール
mariaDBでWordPress用のデータベース・ユーザーを作成
MariaDBの設定
sudo mysql_secure_installationMariaDBのrootのパスワードを尋ねられます(下の11行目)。
初めての場合は、何も入力せずにEnterキー を打鍵。
pi@raspberrypi:~ $ sudo mysql_secure_installation
[sudo] pi のパスワード:

NOTE: RUNNING ALL PARTS OF THIS SCRIPT IS RECOMMENDED FOR ALL MariaDB
      SERVERS IN PRODUCTION USE!  PLEASE READ EACH STEP CAREFULLY!

In order to log into MariaDB to secure it, we'll need the current
password for the root user. If you've just installed MariaDB, and
haven't set the root password yet, you should just press enter here.

Enter current password for root (enter for none):
下の8行目では n を入力。理由が複雑なため、上記DigitalOceanページをご覧ください。
OK, successfully used password, moving on...

Setting the root password or using the unix_socket ensures that nobody
can log into the MariaDB root user without the proper authorisation.

You already have your root account protected, so you can safely answer 'n'.

Switch to unix_socket authentication [Y/n] n
下の3行目では、y を入力。理由が複雑なため、上記DigitalOceanページをご覧ください。
You already have your root account protected, so you can safely answer 'n'.

Change the root password? [Y/n] y
mariaDB のパスワード設定後、「匿名ユーザーを削除してください」とのことなので、y を入力。
Remove anonymous users? [Y/n] y「リモートからのroot接続を不許可にしますか?」とのことなので、y を入力。
Disallow root login remotely? [Y/n] yテストデータベースとそれへのアクセスを削除しますか?とのことなので、y を入力。
Remove test database and access to it? [Y/n] y「これまで設定変更してきた特権内容を再読込して、すぐに有効にしますか?」とのことなので、y を入力。
Reload privilege tables now? [Y/n] ymariaDBの設定が完了しました。
WordPress用のデータベース・ユーザーを作成
WordPress用のデータベースをMariaDBで作成します。
- データベース名:(例)wordpress
- MariaDBユーザー名:(例)pi
- パスワード:(例)password
上の例では分かりやすくするために単純な文字列を使っています。
データベースに外部侵入されるとWordPressサイトが乗っ取られて改ざんされるので、
推測されにくい任意の文字列で作成してください。
1.MariaDBのrootユーザーとして入る
sudo mariadb -u root -pMariaDBのパスワードを尋ねられます。下の2行目部分。
上記で設定したmariaDBのrootユーザーのパスワードを入力。
pi@raspberrypi:~ $ sudo mariadb -u root -p
Enter password:
Welcome to the MariaDB monitor.  Commands end with ; or \g.
Your MariaDB connection id is 31
Server version: 10.11.11-MariaDB-0+deb12u1 Debian 12

Copyright (c) 2000, 2018, Oracle, MariaDB Corporation Ab and others.

Type 'help;' or '\h' for help. Type '\c' to clear the current input statement.

MariaDB [(none)]>
2.上の11行目に、以下を一つずつ入力してEnter。
Point 行末は半角セミコロン ; で終わります。
wordpress という名前のデータベースを作成。
# 'wordpress'を置き換えてください。
create database wordpress;データベースユーザー pi , パスワード password として作成。
# 'pi'と'password'を置き換えてください。
create user 'pi'@'localhost' identified by 'password';wordpress とう名前のデータベースの全ての権限を、ユーザー pi, パスワード password として特権を付与。
# 'wordpress'と'pi'と'password'を置き換えてください。
grant all on wordpress.* to 'pi'@'localhost' identified by 'password';特権をフラッシュ。
flush privileges;MariaDBを終了して抜ける
exit;PHP 拡張機能を追加インストール
既にインストール済で重複するものが多いのですが、php関連で不足するとWordPressが正常に動作しない経験を何度もしたことがあるので、
この段階で念の為、インストールします。
コマンド sudo apt install
# PHPを追加インストール
sudo apt install php-curl php-gd php-mbstring php-xml php-xmlrpc php-soap php-intl php-zipnginx を再起動して、phpを反映させます。
sudo systemctl restart nginxWordPress ダウンロード
- tmpディレクトリにWordPressパッケージをダウンロードして一時的に作業する。
- tmpディレクトリからDocumentRootDirectoryへWordPressパッケージ全体をコピーする。
DocumentRootDirectory 配下にファイルが無いのを確認します。
もしファイルがあれば、全て削除します。
注意
index.html、index.phpファイルなどが残っていると、WordPress関連のファイル読み込み順序に影響を及ぼす可能性があるので、ディレクトリ内を空の状態にしておきます。
pi@raspberrypi:~ $ cd /var/www
pi@raspberrypi:/var/www $ ls
cute.mydns.vc  html
pi@raspberrypi:/var/www $ cd ./cute.mydns.vc
pi@raspberrypi:/var/www/cute.mydns.vc $ ls
index.html  info.php
pi@raspberrypi:/var/www/cute.mydns.vc $ sudo rm index.html
pi@raspberrypi:/var/www/cute.mydns.vc $ sudo rm info.php
pi@raspberrypi:/var/www/cute.mydns.vc $ ls
pi@raspberrypi:/var/www/cute.mydns.vc $
コマンド cd
# tmpディレクトリに移動(一般に、一時的な作業を行うディレクトリ)
cd /tmpコマンド curl
# WordPressのgzip形式圧縮ファイルをtmpディレクトリにダウンロード
curl -O https://wordpress.org/latest.tar.gzコマンド tar
# ダウンロードした圧縮ファイルを解凍(tmpディレクトリ内で)
tar xzvf latest.tar.gzコマンド touch
# .htaccessファイルを作成
touch /tmp/wordpress/.htaccessコマンド cp
# wp-config.phpファイルの作成
cp /tmp/wordpress/wp-config-sample.php /tmp/wordpress/wp-config.phpコマンド mkdir
# upgradeディレクトリの作成
mkdir /tmp/wordpress/wp-content/upgradeコマンド sudo, cp
注意 ドメイン部分を変更してください。
# WordPressプログラム一式をDocumentRootDirectoryへコピー
sudo cp -a /tmp/wordpress/. /var/www/cute.mydns.vcWordPress ディレクトリ構成を調整
- DocumentRootDirectoryの権限を変更する:
- nginxに権限を渡して、ブラウザからのリクエストに応じられるようにする。
- 所有権を変更していないと、「ロケール言語変更ができない」「プラグイン削除できない」という不具合に遭遇しました。
- wp-config.phpファイルを編集する
- 認証用ユニークキーの貼り付け
- データベース情報の入力
DocumentRootDirectoryの権限を変更
コマンド sudo, chown
Point www-data は、nginx のユーザー名を指します[12]/etc/nginx/nginx.conf ファイル内で記述されています。。
# DocumentRootの所有権を変更
sudo chown -R www-data:www-data /var/www/cute.mydns.vc# DocumentRootディレクトリ配下の権限変更
sudo find /var/www/cute.mydns.vc/ -type d -exec chmod 750 {} \;
sudo find /var/www/cute.mydns.vc/ -type f -exec chmod 640 {} \;wp-config.phpファイルを編集
1.認証用ユニークキーを取得する。
コマンド curl
# 認証用ユニークキーをオンラインジェネレート
curl -s https://api.wordpress.org/secret-key/1.1/salt/# (見本)取得した認証用ユニークキー
define('AUTH_KEY', '_St:;5pLASQ(!F0SEHR}UVI:!a*6lVGz3-WT^LNzxCB$~dss3r[W~8^4MAH}I}MI');
define('SECURE_AUTH_KEY', '(T1gMu5fW[N.UcDFhWGw3+/hs_ct:#CQ.f4e*uB9`b iA7E.C%bE`m+12dOV#qA8');
define('LOGGED_IN_KEY', 'UK0P~7PxC8i^Jk&h/-y*]O<i(d;X1C6$fqB_7>(zJ%1hcwR-;qt2,*x=-La*h`^O');
define('NONCE_KEY', 'J$rKf@j?@^gk}r$e/VtU5m=;bfV-$=E<B(QNr;{^[(1t-qe|B|nmH%oUcbxR@xM}');
define('AUTH_SALT', '][,? 8>-y[d*+%XeLEP*c7VX.kJU3K~cs=5$B9#LU>zH5O69>^v},(ASm_,k9h+)');
define('SECURE_AUTH_SALT', 'C |qZ0SIBLQsh Vf=H@]nB>$RXbCFrCI0:}ws>D^F3A^Um090b-@|7TWc.wO%-2b');
define('LOGGED_IN_SALT', '{D{YwI*0>zDLP?o+kf]6L}_3P#!nCfoH?ySL/-6hDBpN.oE!-s9<~H1#]TxN:a+@');
define('NONCE_SALT', 'ON(LQDSGd{Ta-.:!ELKMaj.dHQ585u!A_8-(V5Oa8<gBt2500w8cBU]r=vSlcj-F');2.wp-config.phpファイルをnanoで編集。
- 認証用ユニークキーの貼り付け
- 上記で設定したデータベース情報を入力
define( 'FS_METHOD', 'direct' );を追記
sudo nano /var/www/cute.mydns.vc/wp-config.phpサンプル部分を削除して、上で取得した認証用ユニークキーを貼り付けます。
*/
define( 'AUTH_KEY',         'put your unique phrase here' );
define( 'SECURE_AUTH_KEY',  'put your unique phrase here' );
define( 'LOGGED_IN_KEY',    'put your unique phrase here' );
define( 'NONCE_KEY',        'put your unique phrase here' );
define( 'AUTH_SALT',        'put your unique phrase here' );
define( 'SECURE_AUTH_SALT', 'put your unique phrase here' );
define( 'LOGGED_IN_SALT',   'put your unique phrase here' );
define( 'NONCE_SALT',       'put your unique phrase here' );

/**#@-*/wp-config.phpファイル内の以下の部分に上記で作成したデータベース情報、
- データベース名:(例)wordpress
- データベースのユーザー名:(例)pi
- データベースユーザーのパスワード:(例)password
これらを入力します。
変更前
// ** Database settings - You can get this info from your web host ** //
/** The name of the database for WordPress */
define( 'DB_NAME', 'database_name_here' );

/** Database username */
define( 'DB_USER', 'username_here' );

/** Database password */
define( 'DB_PASSWORD', 'password_here' );
変更後
// ** Database settings - You can get this info from your web host ** //
/** The name of the database for WordPress */
define( 'DB_NAME', 'wordpress' );

/** Database username */
define( 'DB_USER', 'pi' );

/** Database password */
define( 'DB_PASSWORD', 'password' );
ファイルシステムへの書き込み方法を追記します。
注意
私は当初、この記述を見落としてWordPressをインストールし、プラグイン削除の際にFTP資格を求めるダイアログが現れ、これを解決するのに3日ほど損失しました。
プラグイン削除の際に、以下のようなFTP資格を求めるダイアログが現れます。
記述忘れにご注意ください。
# 追記する
define( 'FS_METHOD', 'direct' );
追記の場所は以下のあたり。
/** このあたりに追記  ファイルシステムへWordPressが直接書き込む*/
define( 'FS_METHOD', 'direct' );

/**#@+
* Authentication unique keys and salts.nanoを閉じて保存します。
WordPress のインストール(ブラウザから)
Ubuntuのブラウザからアクセスします。
WordPress.orgによると、
http://目的とするドメイン/wp-admin/install.php
WordPress のインストール, 2025-09-01閲覧。
今回の例では、
https://cute.mydns.vc/wp-admin/install.phpにアクセスします。
無事にインストール画面が表示されました。
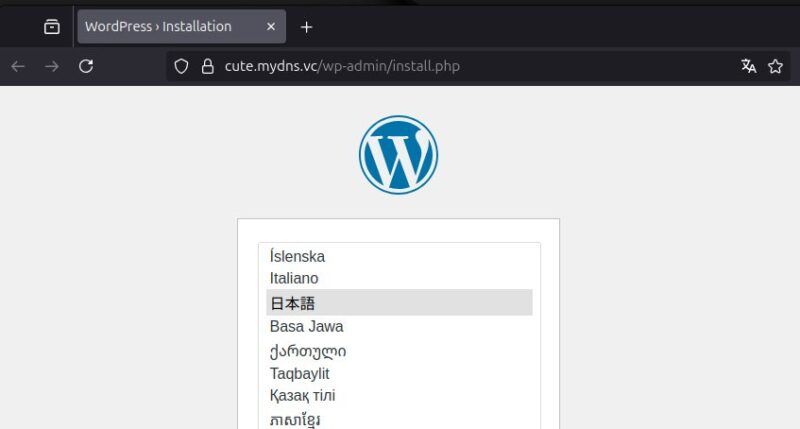
この画面が表示されると、とても達成感に満たされます。
nginx で WordPress インストール画面が表示されないときの対処策
nginx の内部エラーが表示される
エラーコード: 500 Internal Server Error
など、エラーメッセージが表示された場合。
事例1
sudo cat /var/log/nginx/error.logエラーログを確認します。
2025/09/02 13:50:44 [error] 2218#2218: *1 FastCGI sent in stderr: "PHP message: PHP Parse error: syntax error, unexpected identifier "https" in /var/www/cute.mydns.vc/wp-config.php on line 56wp-config.php の 56行目に文法エラーがあるとのことです。
 56 curl -s https://api.wordpress.org/secret-key/1.1/salt/
 57 define('AUTH_KEY',         '_St:;5pLASQ(!F0SEHR}UVI:!
58 define('SECURE_AUTH_KEY', '(T1gMu5fW[N.UcDFhWGw3+/hs_ct:#CQ.f4e*uB9`b 56行目にエラーを見つけたので、削除して nanoを閉じて保存。
事例2
- 認証用ユニークキーの行末を確認してみる
sudo cat /var/log/nginx/error.logエラーログを確認すると、
2025/09/06 08:16:43 [error] 7111#7111: *7 FastCGI sent in stderr: "PHP message: PHP Parse error: syntax error, unexpected identifier "define", expecting ")" in /var/www/cute.mydns.vc/wp-config.php on line 95" while reading response header from upstream, client: 192.168.0.XXX, server: cute.mydns.vc, request: "GET /wp-admin/install.php HTTP/1.1", upstream: "fastcgi://unix:/run/php/php8.2-fpm.sock:", host: "cute.mydns.vc"wp-config.php ファイルの 95行目を指摘しているようでしたが、色々変更しても直らない。
"define", expecting ")"
この部分が気になり、貼り付けた認証用ユニークキーを確認すると、行末で
);
この2文字が抜けていました。
書き足すと、正常にインストールできました。
データベースへの接続確立エラーが表示される
PointError establishing a database connection
This either means that the username and password information in your wp-config.php file is incorrect or that contact with the database server at localhost could not be established. This could mean your host’s database server is down.
Are you sure you have the correct username and password?
Are you sure you have typed the correct hostname?
Are you sure the database server is running?
If you are unsure what these terms mean you should probably contact your host. If you still need help you can always visit the WordPress support forums.
一旦、ご自身が作成した全てのデータベース及びユーザーを削除するのが、
一番早い解決策になると思います。
mariaDB データベースを削除
上記の方法で、mariaDBにログインする。
sudo mariadb -u root -pデータベース一覧を表示。
show databases;MariaDB [(none)]> show databases;
+--------------------+
| Database |
+--------------------+
| information_schema |
| wordpress |
| mysql |
| performance_schema |
| sys |
+--------------------+
5 rows in set (0.001 sec)データベースを削除。
drop database wordpress;MariaDB [(none)]> drop database wordpress;データベース削除の確認。wordpress というデータベースが削除された。
show databases;MariaDB [(none)]> show databases;
+--------------------+
| Database |
+--------------------+
| information_schema |
| mysql |
| performance_schema |
| sys |
+--------------------+
4 rows in set (0.001 sec)mariaDB ユーザーを削除
データベースのユーザーを削除。
select user,host from mysql.user;memo
localhost の綴りの間違いに気づきました(5行目)。
MariaDB [(none)]> select user,host from mysql.user;
+-------------+-----------+
| User        | Host      |
+-------------+-----------+
| pi          | loaclhost |
| mariadb.sys | localhost |
| mysql       | localhost |
| root        | localhost |
+-------------+-----------+
4 rows in set (0.002 sec)drop user pi@loaclhost;MariaDB [(none)]> drop user pi@loaclhost;
Query OK, 0 rows affected (0.005 sec)mariaDBを抜ける。
exit;MariaDB [(none)]> exit;新しくデータベース情報を作り直して、wp-config.phpを編集
データベース接続エラーが解決できたと思います。
WordPressサイトをWWWへ公開した感想
1秒間に3回、不正なログインを海外から試行されます。
当初は、「Webサーバがダウンしても構築し直せばよい」との気構えでいましたが、
ルーターが多忙になるせいなのか、
家のWi-Fi 全体の接続がぎこちないように感じたもので、
ルーターでのポート開放を止めました。
今は家庭内LANの範囲だけでWordPressを使っています。
ただ、今回実際に物理マシンを使ってのWebサーバ構築の経験は、
とても良い経験になりました。
2023年の頃より遥かに理解が深まりました。
私はプロではなく素人です。
本記事において、至らない点、不備な点もあったと思います。
趣味の範囲の内容ですが、
最後までお読み頂きありがとうございました。
以上で、
ラズパイbookwormにWebサーバnginxを構築し、WordPressを設置する方法
は終わりです。
おつかれさまでした。
本記事のコンテンツは以上です。
お役に立てれば嬉しく思います。
脚注
| ↵1 | ラズパイのTDP3.4W, 全国家庭電気製品公正取引協議会が目安として定めている電力料金単価を31円/kWhとした場合、(3.4W÷1000)☓31円/kWh☓24時間☓30日≒75.9円。 |
|---|---|
| ↵2 | 2025-08-29現在。 |
| ↵3 | Ubuntuのphpバージョンは、8.3, 2025-09-02現在。 |
| ↵4 | Nginx は PHP を直接処理できないため、PHP-FPM が FastCGI というプロトコルを利用して Nginx と PHP の橋渡しを行います。引用:入門 – Nginx + PHP-FPM の仕組み, Zenn, 2025-09-05閲覧。 |
| ↵5 | デフォルトではないパーマリンクがクエリ文字列を使っても壊れないように、”?$args “の部分をインクルードしています。引用:Nginx – サポートフォーラム – WordPress.org 日本語, 2025-09-05閲覧。 |
| ↵6 | 参考:Ubuntu 24.04 : Nginx : バーチャルホストの設定 : Server World, 2025-08-29閲覧。 |
| ↵7 | 出典: PHP: コア php.ini ディレクティブに関する説明 – Manual, 2025-08-30閲覧。 |
| ↵8 | 参考:PHPのメモリ割当量について – Go for it!, nginxの最大接続数は、worker_connectionsでデフォルト値は1024 – CAFE BREAK, 2025-08-30閲覧。 |
| ↵9 | 参考:リソースの見方を今一度確認してみよう~メモリ使用率~ | SIOS Tech. Lab, 2025-08-30閲覧。 |
| ↵10 | php.iniファイルのアップデートにより、将来的に行番号が変更する可能性があります。 |
| ↵11 | 出典:XAMPP | PHPの設定ファイル(php.ini)を編集する, 2025-08-30閲覧。 |
| ↵12 | /etc/nginx/nginx.conf ファイル内で記述されています。 |


コメント